Capture & Stream is a hybrid-lite teaching mode being rolled out as part of the university’s Hybrid Teaching Spaces project. It allows online student to join in-person teaching sessions with the ability to listen, watch and view any presentation of content. In comparison to the future Dual-Mode setup, Capture and Stream has some limitations, but as an intermediary solution it provides a solid way to ensure that our remote students can continue to engage with lessons wherever they connect from.
Key information
- Capture & Stream is intended as an intermediary ‘hybrid-lite’ solution while the more capable Dual-Mode rooms are brought online.
- Simplistically, this workflow is similar to running an online Collaborate session, but with students in the room with you.
- Capture & Stream will be available by default from the start of teaching in 21/22 in the 50 designated Hybrid Teaching Spaces. These rooms will gradually upgraded to Dual Mode over the first semester without interrupting ongoing teaching.
- Although there are limitations to this mode, getting comfortable with the equipment and planning your delivery can ensure a good experience for remote students.
Summary
When using this mode, the teacher starts in the room with in-person students and simultaneously connects to online students through Collaborate.
Ingredients
- A teaching room complete with Lecturn PC (or laptop), Projector/Screen etc.
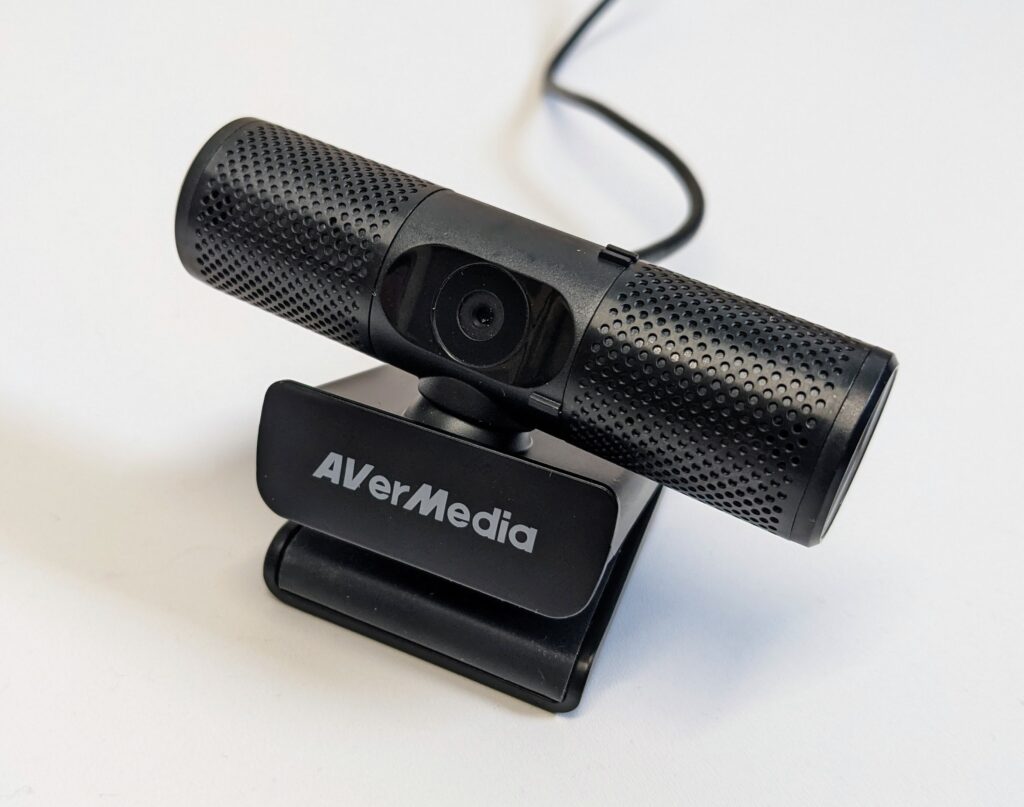
- A USB Webcam
- A good quality USB Mic
- An online teaching application accessible to your online students and capable pof recording your session e.g. Collaborate
- Students in the room
- Students joining online
Basic recipe
- Switch on the lecture computer and find your module on My Dundee.
- Open your Collaborate Course Room and check your mic/camera setup.
- Confirm that your online students are also in the session, and can hear and see you.
- Set up any presentation or other share content through Collaborate.
- Switch on the AV Panel (the thing that makes the projector work)
- Make sure that what is displayed on the monitor is also what is displayed on the projector screen, and is what your online students can see.
- Do one final check that everyone can hear you, see you and see any presentation content.
- Press Record in Collaborate (if appropriate) and begin.
- Throughout the session, simply check that online student are still able to hear and see you.
Quick Guide
You can download and print this quick guide:
Step 1: Pre-session
1.1 Timetabling
Central timetabling informs students when teaching sessions are scheduled via the usual channels.


Since there are no specific joining instructions attached to these entries, you will need to ensure that your remote students are clearly informed of how to connect i.e. via the Collaborate course room.
1.2 Session planning
You should plan your teaching session with additional consideration for those joining online. Capture & Stream is a limited form of hybrid, so you need to be aware of the limitations any online students will experience. See the section titled ‘The online student’s experience‘ below.
- Check out the self-paced Enhance Your Module hosted on My Dundee for a holistic look at planning your teaching in a blended world.
- Here’s a recent Focus On session with Dr Sarah Halliday talking about “Getting the most out of Collaborate“
1.3 Communicate with your students
Even in ‘normal’ times, you cannot take anything for granted in terms of what your students are aware/not-aware of. It should go without saying that frequent and consistent communication is key, especially when a segment of your students are remote.
Be sure that along with any pre-session notes, etiquette guides, readings etc., you prepare your students for where and how sessions will run.
Step 2: Prepare the computer
Once in your teaching room, the first thing to do is to switch-on the lectern PC and get signed into your Module on My Dundee.
2.1 Login to the Lecturn PC
Nothing special here – log in to the lectern PC with your usual university credentials. I’m sure this was a well practiced muscle memory in 2019, but it’s surprising how quickly you lose that.
Check out UoDIT’s login guide for more information.
2.2 Open My Dundee
Open up the default web browser (Edge) and go to my.dundee.ac.uk. Login if asked using your same university credentials.
2.3 Find and open your Module
Go to the Modules page (choose from the left hand menu) and open the required module. You can favourite modules to make sure they’re easy to find or use the search tool.
Step 3: Prepare the Collaborate session
Blackboard Collaborate is the university’s supported tool for online teaching and we are working to adapt it to hybrid workflows. Returning students from last year should be familiar with the tool, as will teaching staff.
3.1 Start Collaborate session
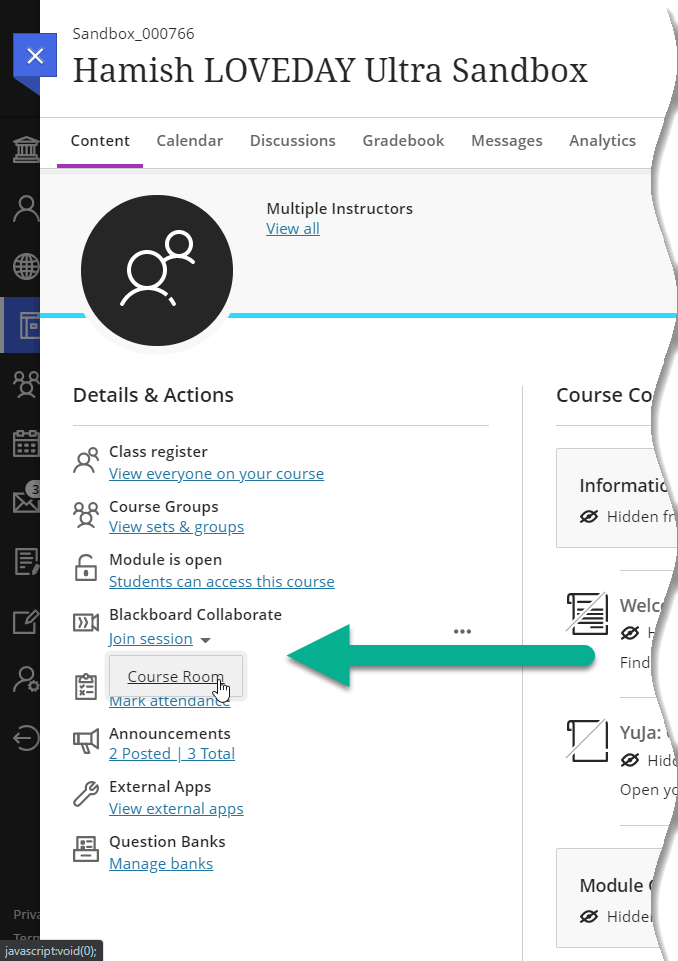
- Inside your module, look on the left-hand menu for ‘Blackboard Collaborate’.
- Click ‘Join Session’ and choose ‘Course room’ to open the session.
- Online students may already be joining at this point so it may be worth saying ‘Hi’ in the chat.
- Once the session is open, you may be prompted to check your audio and video. If not, open ‘Collaborate panel > My Settings > Set up your camera and microphone’
3.1 Mic & Webcam positioning
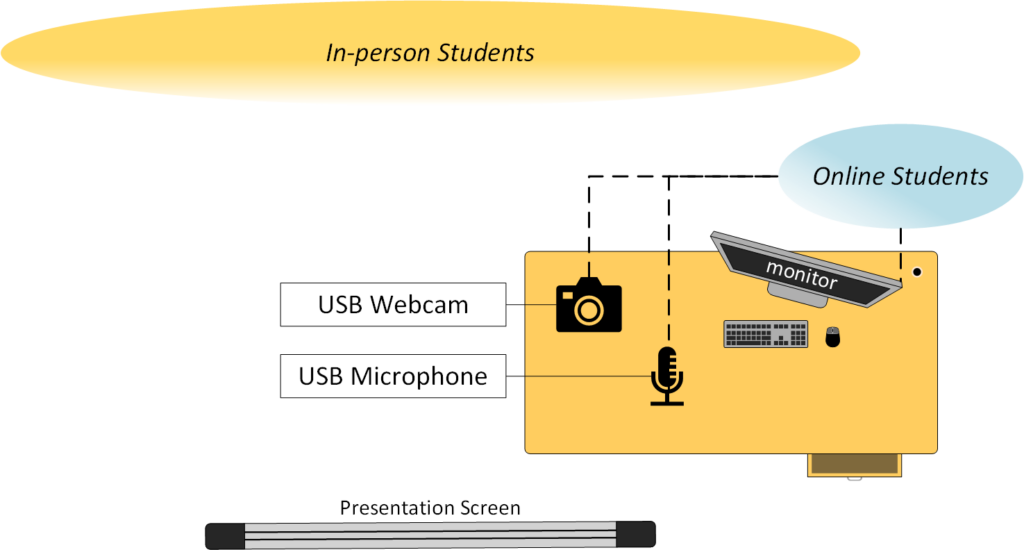
As with the diagram above, Capture & Stream uses standard USB Mics and Web cameras. These devices are being provided with stands and should be plugged into the lectern PC ready to go. However, people don’t always leave the room as they find it, so you may need to double check that each device is plugged in and positioned appropriately.
Rooms will have the default locations for these devices marked on the desks.
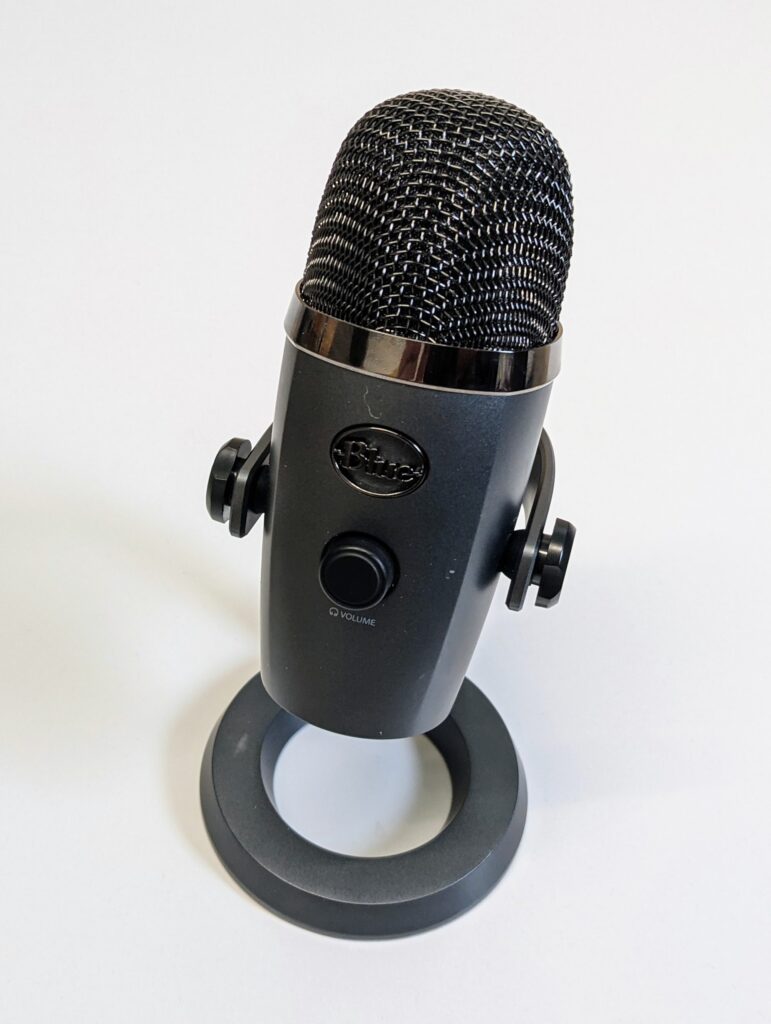
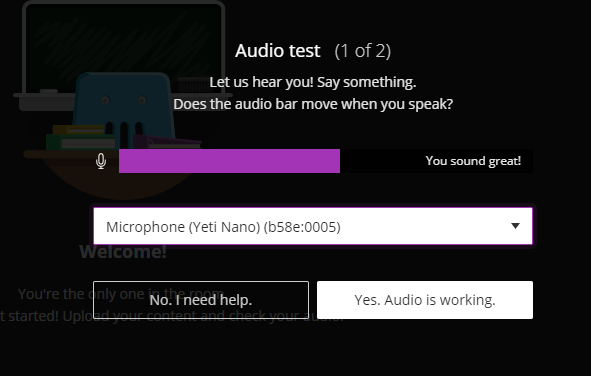
3.3 Test your audio set-up
The Microphone is more important in C&S than the camera, as it is the main channel for you to communicate with your students, since the camera view can be limiting.
- The browser may show a pop-up asking to ‘Use your microphone’. Click ‘Allow’
- Position your mic to roughly cover where you will speak from.
- Ensure the round light on the mic is green (for standard mics)
- In the Collaborate audio test/preview, select the correct microphone in the – this is typically ‘Yeti Nano’.
- Check your levels and select ‘Yes, Audio is working’ when ready.
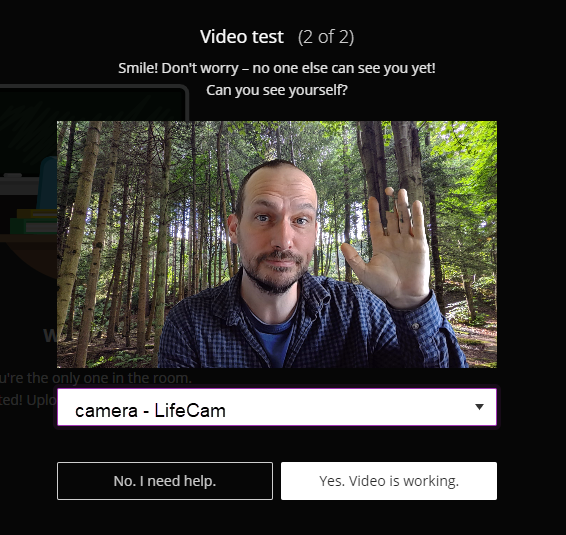
3.4 Test your video set-up
The USB cameras in C&S don’t give the full ‘in-room’ experience that the Dual-Mode setup will bring. However, they provide an important link to the physical room for your online students.
- The browser may show a pop-up asking to ‘Use your camera’ . Click ‘Allow’
- In the Collaborate audio test/preview, select the correct camera from the dropdown list – this is usually ‘LifeCam’
- Use the video test/preview window to check the camera is positioned to cover where you’ll be e.g. the front of the teaching room.
- Click ‘Yes, Video is working’ when ready.
- These cameras do not autofocus or track so you need to be aware of where they are pointing as you teach.
Step 4: Set-up the sharing
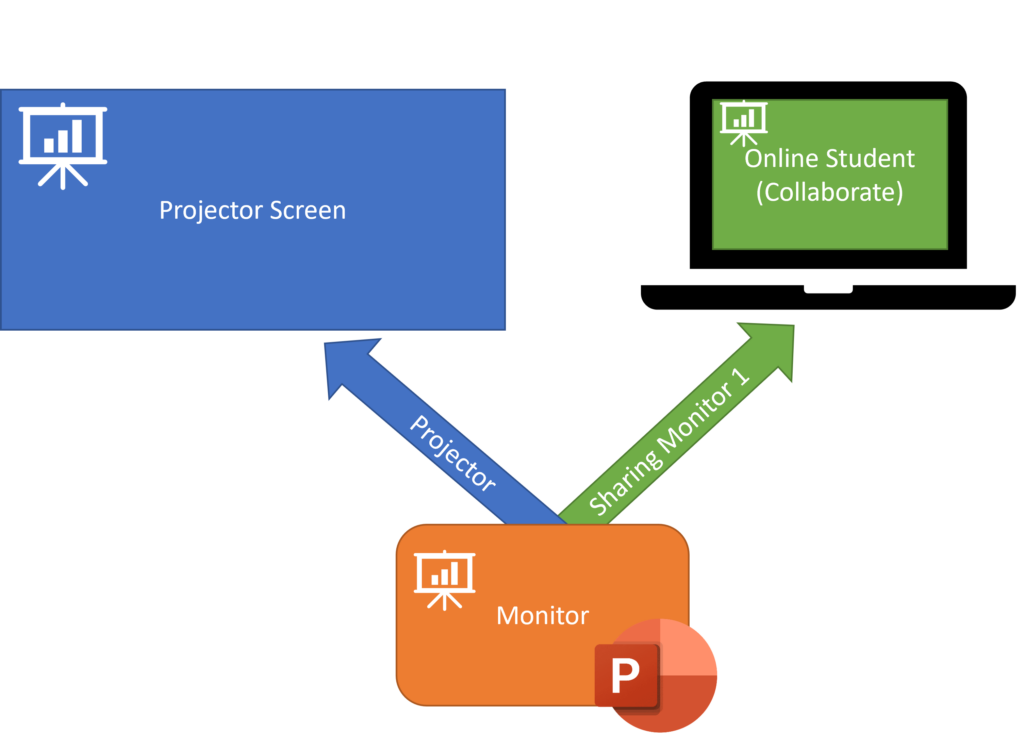
Blackboard Collaborate has a range of options for sharing content, including the simple ability to share your mic and camera. The key is to make sure that whether presenting PowerPoint slides, documents or videos, what can be seen on the projector screen (in-room), is also what can be seen by the remote students through collaborate. The easiest way to do this is to present everything through Collaborate and have the Collaborate window displayed on the projector. Easy.
4.1 Enable audio and video
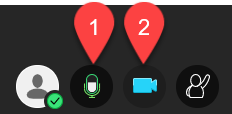
Make sure that:
- Audio is enabled
- Video is enabled
Ask your online students to confirm that they can hear and see you through chat or by raising a hand.
4.2 Sharing Content
We can’t detail every way you could share your content in this guide but it’s worth having a look through the Collaborate help pages. Below is our recommended process for sharing PowerPoint slides so that you can keep the chat on the screen as well as the slide for both in-person and online students.
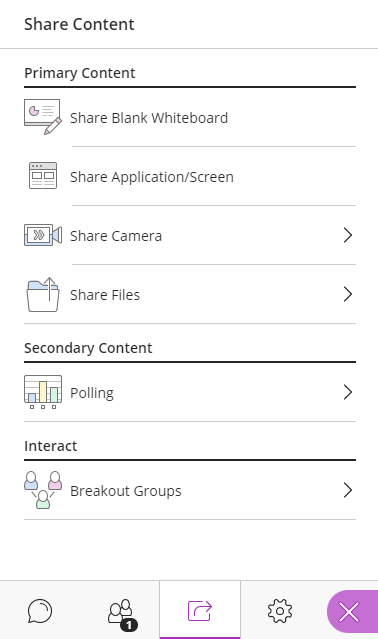
Sharing slides through Collaborate:
- Upload your slides: Collaborate Panel > Share Content > Share Files > + Add Files.
- Wait a few seconds for the slides to be converted.
- Once the slides become available, select the and choose the slide you want to start from.
- Click ‘Share Now’ to begin.
The advantage of sharing slides this way, rather than sharing the whole screen or a specific application, is that you can then use the Collaborate page as you presentation for students in the room. It means that both online and in-person student are seeing exactly the same thing, including the chat window.

Step 5: Start Teaching!
5.1 Switch on the AV Panel
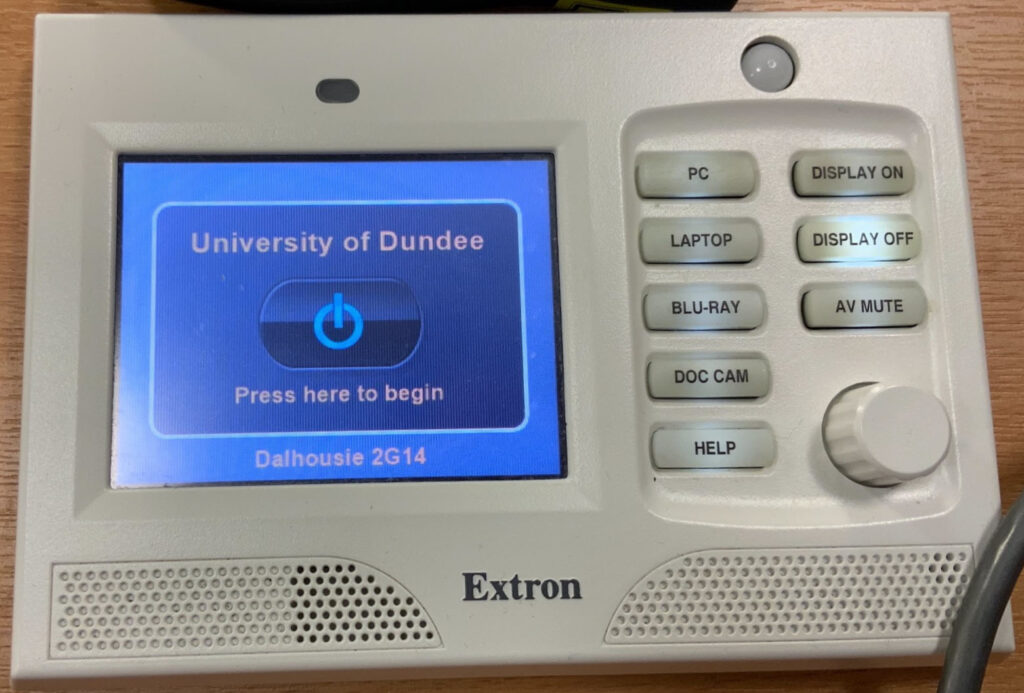
The AV panels will remain the same as pre-lockdown until rooms are upgraded to Dual-Mode. You should switch the panel on and when the system has warmed up, ensure that the projector and monitor are displaying the same thing, just as you would in a normal session.
- Press ‘Display On’ to power up the room’s presentation screen.
- Ensure the PC is selected as the display source.
- If in doubt, switch it off then on again 🙂
5.2 Double check
Before you start teaching, it’s worth doing a quick check that everything is in place – at least until you get confident with the set-up.
- Can your online students hear you?
- Can your online students see you?
- Can your online and in-person students see any presented content?
- Are you able to monitor the chat?
- Are there any points of etiquette you need to make?
- Are you recording?
5.3 Start Recording?
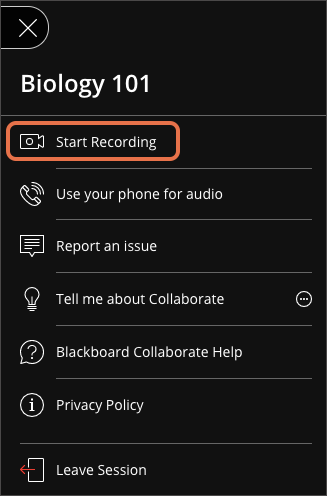
If you are recording all or parts of your session, you can use the Collaborate recording function. Recordings are stored inside your module’s Collaborate area and will only be available to enrolled students and staff of that module by default.
- You should move your recordings into YuJa to get them auto-captioned (automation for this is coming soon).
- There are options for recording, including whether to record the chat available (see the help linked below)
- You can stop and start recording around different sections of your session.
Please refer to the university Policy and Guidelines on the recording of lectures for guidance on what you should and shouldn’t be recording.
Further Tips and Advice
Interacting with online students
You can enhance the experience of your student using a capture & stream step
- The Collaborate chat function is available and you should establish a habit of checking it every so often, just as you naturally do with your in person audience to see reactions and spot any questions.
- Online students can raise their hands using the Collaborate feature, which will also produce a little ping noise over the room audio. This is a good way for online students to get your attention, but remember to consider etiquette for the use of this feature.
- The microphone is the vital link in this mode so make sure your online students can hear you and be sure to reference them frequently. The mics for C&S will not pick up the in-room participants, only the lecturer.
- The camera in this mode is limited, but can create a link for your online students that’s better than simply staring at slides with a disembodied voice. You can move the camera manually to face
- Additional tools can be brought into play such as Mentimeter can create activities and polls that bridge the gap between online and in-person students.
With the limitations of this mode, we recommend you aim for a balanced approach of expectation setting and paying attention to the little things that keep online students connected to the room.
Encourage students in the room to also be on the collaborate session but muted so they can alert you to the chat. Without two screens it becomes very challenging, and as you cannot log in to collaborate twice it is not possible to just bring a second PC/laptop/tablet.
Hi David. Good tip about encouraging students in class to also login to the Collab session, though I’d doubly emphasise the need to make sure they mute their mics and audio to avoid an apocalypse by feedback 🙂
Single screens are a pain when dealing with a scenario like Capture & Stream, but i can assure you the dual monitors are part of the Dual Mode design, coming to the core 50 rooms in the next few weeks.
When I add a PPT file, some Greek letters (e.g. rho) can’t display correctly.
Hi Qi.
Could you submit this issue to help4u@dundee.ac.uk with details about what tools you are trying to use, what you are trying to do, and what the issue is? One of our support team should be able to help.
Have a good day 🙂
When using online hybrid teaching, should the lecturer be able to hear the online students speak? We had it that students could hear and see the lecturer and the lecturer could see the online students but not hear them when they were speaking.
Unsure, if this is as expected?
Hi Caitlin. For a Capture & Stream setup, you will only be able to hear the students if a) they are unmuted, and b) there are working, unmuted speakers in the room. Remember that Capture & Stream is not full hybrid and intended to provide a fully interactive experience for online participants. For a fully hybrid teaching experience, you need to ensure you are booked into one of the Dual-Mode rooms.
However, you may want to report the issue to Help4u to check why audio isn’t working in the room you were using.