What is it?
Turnitin is an assessment tool to check similarity for text-based submissions. This compares a submitted assessment against a database of other papers and journals to detect for similarity.
What does it do?
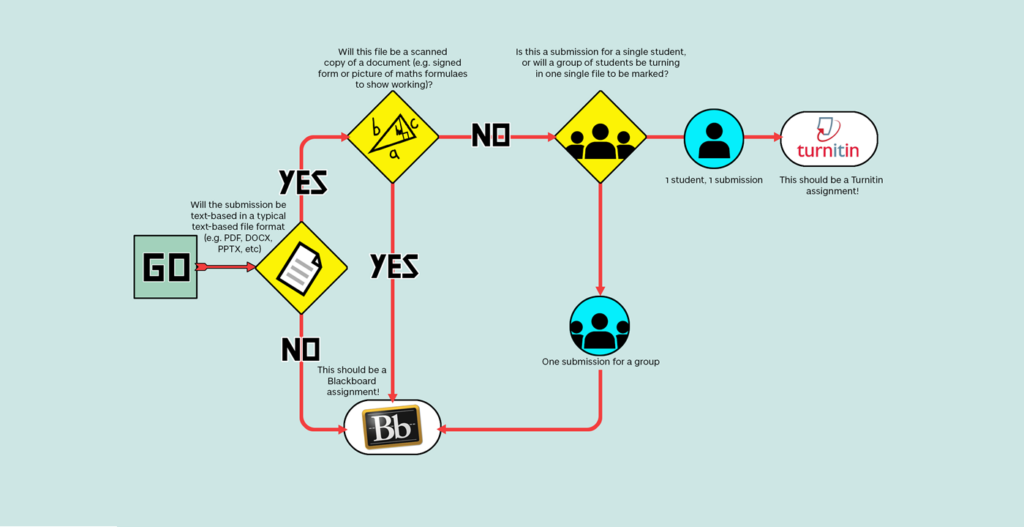
It is recommended by the university that Turnitin is used as the method of assessment submission for individual, text-based submissions. However, Turnitin may be unsuitable for some submissions such as non-text based work or group submissions where there is a single submission for a group of students.
You can use the workflow below to help determine if Turnitin is the right tool.
If Turnitin is the correct tool, you can:
- Use to it detect similarity in a submission
- See a full originality report
- View flags for things Turnitin has identified as unusual
- Provide overall and in-line comments and feedback
- Provide and deploy marks
What should I know?
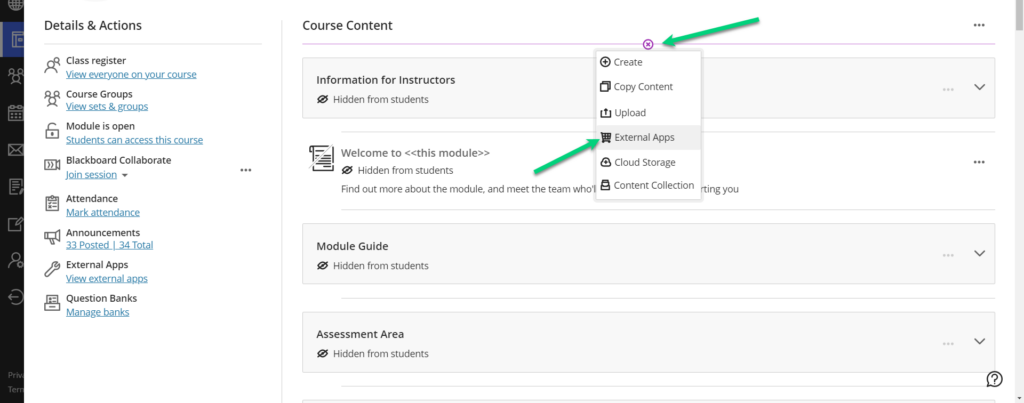
Step 1: Create your Turnitin assignment by selecting the plus icon on your module content and select External Apps from the menu.
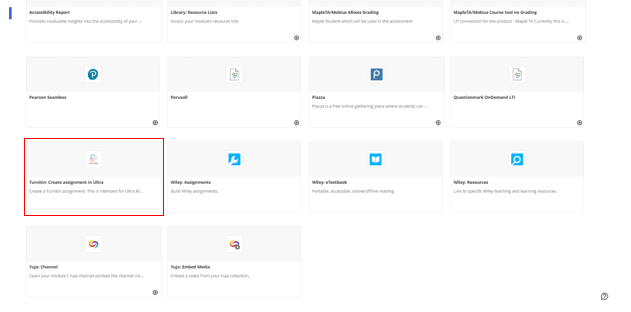
Step 2: Select Turnitin: Create assignment in Ultra from the list.
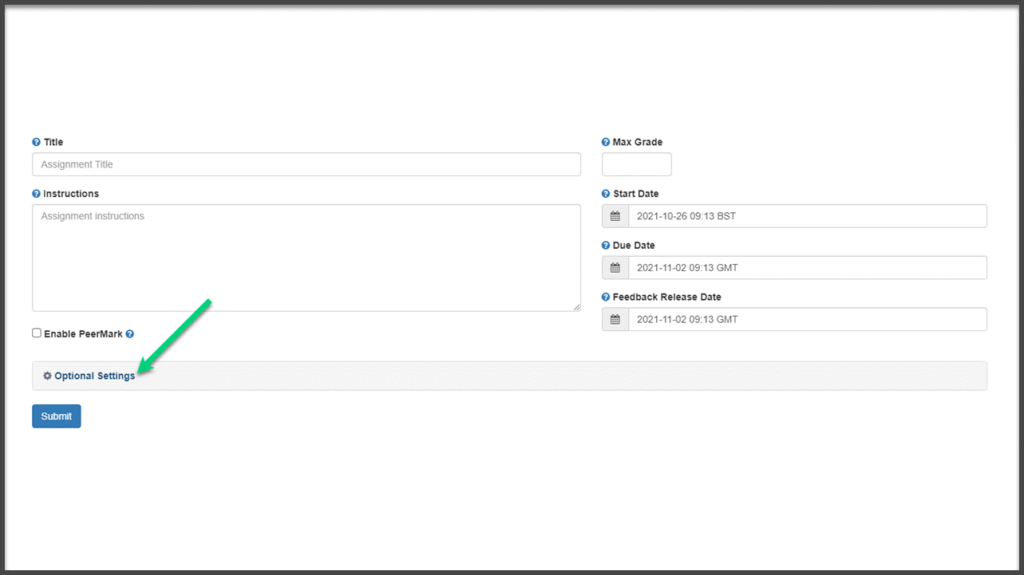
Step 3: Create your assignment. You will need to enter a title, maximum points, the start date , due date, and feedback release date. We’ll go into all of these items below, but it is important to understand the feedback release – this is when the feedback and marks will be made visible to your students. Once this date has passed, the release of marks and feedback cannot be undone, even if you change this date and save your changes. If you marks are accidentally released early, you will need to hide the assignment from students until you are ready to release marks.
Underneath these settings, you’ll see a link for “Optional Settings”. This is a bit of a misnomer as these settings are very important.
Assignment Settings:
Assignment Details
Title: Name the assignment something clear and descriptive.
Instructions: You can use the instructions area to provide information or directions that are specific to this assignment. For example, if you want students to use their matriculation number as the name of the work when they upload it.
Max Grade: If you are using the 23 to alphanumeric scale, then the max grade should be “23”. For more information on using the 23 point scale with Turnitin, you can view our guide here. If you are using Turnitin for formative work, or dissertation similarity checking, then you may wish to enter 0 as the max grade.
If you are in SSEN, you will most likely be using a Percentage to Alphanumeric scale, not the 23 to Alphanumeric scale, so please ignore the advice above for the max grade.
Dates: The start date is when students can start to submit work, and it will also automatically hide the assignment from student view until that date.
We recommend you make the item due at noon on a weekday to ensure that students can receive help if they encounter any technical issues.
The feedback release date should be three weeks after the due date, for work that is being formally marked. If you need to change this, you must do it before the feedback release date has passed. Once this date has passed, the release of marks and feedback cannot be undone, even if you change this date and save your changes. If you marks are accidentally released early, you will need to hide the assignment from students until you are ready to release marks.
Submission settings
Submit papers to: Normally, leave as set. However, if you are doing formative work and intend to have a different dropbox for the final submission, then change the top from standard to no repository. (That avoids students apparently having plagiarised themselves)

You can use the tick boxes below this to:
- Allow submissions of any file type – In general, you should not use this setting. This setting will allow students to upload file types that will not load properly in Turnitin. If you expect student to be submitting file types other than the standard accepted formats, you ought to be using a Blackboard assignment instead.
- Allow late submissions – in most cases, students should be allowed to submit late. All late submissions will appear red in the submission in box.
- Enable anonymous marking – the university guidelines state that where practical, work should be marked anonymously. There may be exceptions such as reflections or formative work.
- Attach a rubric – if you use a rubric or grading form in your marking, you can do so here. Do not attach a new rubric if one is already in place and has been used. This action will wipe all feedback and marks that were attached to the rubric.
Compare against
Leave the compare against settings to select all (should be set as default).

Similarity Report
Generate Similarity Reports for student submission: We generally recommend that this should be set to “generate reports immediately (students can resubmit until due date)”. Allowing students to resubmit only allows them to resubmit until the due date, one that date has passed students cannot resubmit. Resubmissions are also important to allow students to upload a new file before the due date if they submit the wrong file.
Allow students to view Similarity Reports: This should be selected by default. If you do not want your students to see their similarity reports, please inform them of this.
Exclusions: Leave all as shown (these should be the defaults). Staff can adjust these settings on an individual student submission later if needed.
Additional settings/Save these settings for future use: We recommend selecting this if you will be using the same settings frequently.

Exclude assignment template
In the Optional settings area of the set-up, you can find a section for Exclude assignment template. You can either upload a file or add text directly by using the ‘Create Custom Template’ button. This is useful if you have a template that all students will use for this assignment as it will help exclude these expected similarities.
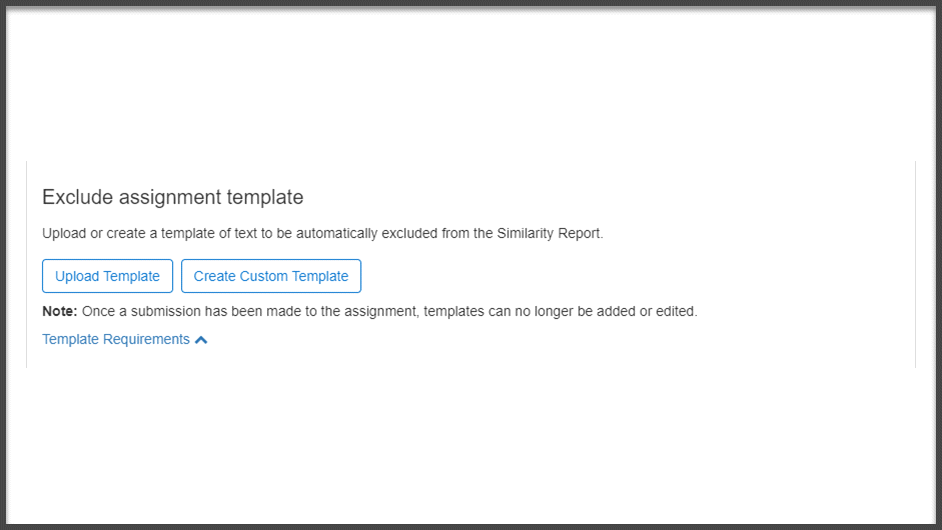
If you want to use this, we strongly suggest that you use the Upload Template button to upload a file (.docx or PDF are recommended). You can add text directly in the custom template, but our testing showed that this wasn’t as consistent in excluding all of the content from the template.
Always pay attention to the total score of a similarity report! We used a template that includes a table for students to enter standard information such as user ID, module code, and module title. When we used this, we were able to add a new row in the table and add text in this row. The content in this row was not included in the similarity report – the exclusion tool assumed anything in the table ought to be included.
You can only add, edit, or remove the template before students submit files. Once any student has submitted work to the submission point, you cannot make any changes to this setting.
However, as always, you can adjust the exclusions in the Feedback Studio. To remove the template, go to the exclusion tab. Toggle off the option to Exclude Assignment Template and click Apply changes.
