What is it?
This guide will talk you through how to arrange and manage a Collaborate session in My Dundee.
What does it do?
To join, create or manage sessions, go into your module – the Collaborate links are in the left-hand menu.
The Join Session link is where you can join all sessions that are open. You can also access the Course Room from here.
The Course Room is available for you and your students to go in and use at any time. You may want to close it before and/or during your scheduled sessions in order to avoid confusion.
What should I know?
In the information below, we’ll walk you through all of the steps to create a session and the session settings. Remember to Save whenever you are done setting up your session, and after any edits you make to it.
Set up a session
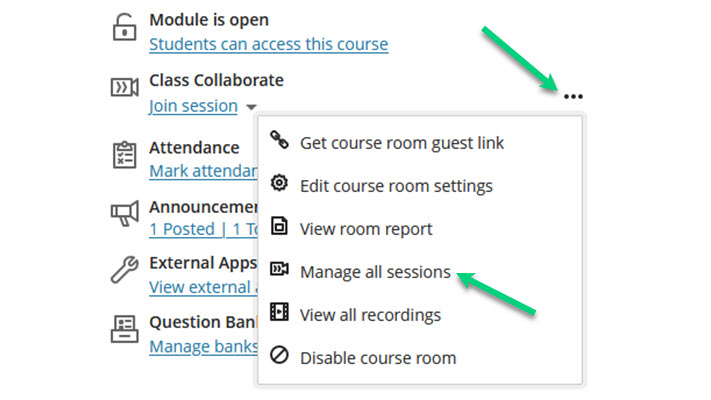
Step 1: Click on the ‘…’ menu and select the Manage all sessions option.
Step 2: Click on the grey Create Session button on the top left-hand side of the screen. If there are no upcoming sessions, you may also see this button in the middle of your screen.
A pop-up window will appear on the right-hand side of the screen which is where you can put in the details of your session.
Step 3: Enter the mandatory event details – these are the session name, start and end times. In addition to these, there are other settings you may want to check or change, so we will walk through all settings in the accordian menu below.
Event Details tab
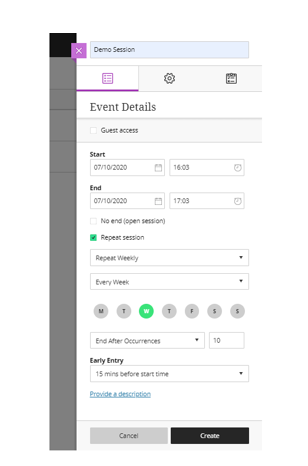
- Here you can add the session title at the top.
- Below that is a tick box for Guest access. This will generate a link that you can share with users who are not enrolled on your module or guest speakers from other schools/departments. The link will only generate after you have saved the session settings.
- Next, select the start and end date and times using the calendar and clock functions. Ticking the No end box will keep the session running until you choose to close it (similar to the Course Room). This will also negatively interfere with recording attendance, so we recommend avoiding this setting in most cases.
- Ticking the Repeat session box allows you to set this session up on a recurring basis. Ticking this box gives you the option to select the days it will run on and when it will be repeated (daily, weekly or monthly). You can opt to repeat it every week, every 2 week, etc. You can also choose to end your session after a certain number of occurrences or on a certain date.
- Early entry gives you the option to allow users (moderators included) into the session early. It is advisable to keep this as 15 mins before start time.
- You can use the Provide a description area to give further details about your session.
Session Settings
Click into the cog wheel at the top of the window to change the session settings.

- Select the default role you will give to your attendees. We recommend that you leave this as ‘participant’ as that way students will enter with that role. All instructors will enter the session as ‘moderator’ by default.
- Next you can adjust downloading settings. The software allows users to download recordings, but according to current university policy, this should not be enabled. You can review the policy here for a full explanation.
- Below that you can restrict visible profile pictures to show moderator profile images only.
- You can determine what participants have access to when they enter the session. You can change all of these during the live session. We recommend setting up the session with Share audio and Share video disabled. This ensures a smooth and quiet beginning as people enter the session.
- If you will have a session from 250 – 500 users, you will need to select the box to allow Large scale sessions.
- You may want to enable Hide profanity in chat messages. We recommend that you use this setting in your sandbox if you have questions about what will or will not be censored. Anatomically correct language will be censored, so this is not recommended for modules where you expect this language to be used in the chat window (e.g. nursing, medicine, etc.). Additionally, Blackboard is an American company, so some British profanity will not be caught by the filter.
- Below that is the ability to use AWS Chime for audio and video. This can improve functionality, but also has a few limitations (such as not being available for large-scale sessions). For more information on this feature, you can review the vendor’s guide on this topic.
It may be useful to understand the basics around Collaborate roles. We’ve provided short summaries below, but you can also read our full guide on this topic.
- Moderator – This role has full permissions. Everyone with the instructor or support role on a module have the Moderator role in Collaborate by default.
- Presenter – has audio and video available by default, can use anything in the “Primary Content” area of the “Share Content” tab.
- Participant – Exact permissions may vary based on your session settings. By default, all students on the module have this role and it will allow students to view the session but not to share content or change settings.
Note: The last tab in the session set-up window is related to attendance and will not be covered as SEAts is the attendance management tool used by the University of Dundee.