What is it?
The Gradebook is a feature in Blackboard that allows you to access data related to coursework and assessments in your module.
What does it do?
The Gradebook is populated with students when they’re enrolled in your course. You can grade coursework, manage items, and post grades.
What should I know?
Step 1: To access the Gradebook, go into your module and select the Gradebook tab.

Step 2: The Gradebook has two views, list view and grid view. You can use the icons in the top left-hand side of the screen to toggle between the two views.

List View
The List view has two tabs and views within it, Markable Items and Students.
The Markable Items will list all of the assessments in the module, and will let you see at a glance if the item is hidden or visible to students (hidden item will have a grey slash against them), the due date, the marking status, and you can also post all grades for an assessment from this page.
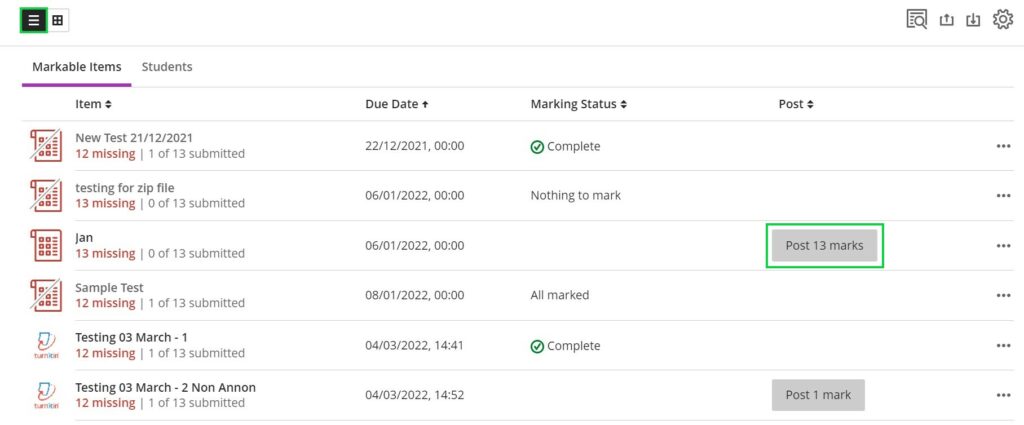
You can also click into the assessment title to go directly to that assessment.
The Students tab will list all of the students in your module and also show their student ID, username, the last time the accessed the module, and if they have any accommodations. If a student has accommodations applied, they will have a purple flag icon above their name.
If you click on a student’s name from this tab, you’ll be brought to an overview for that student. It will display all of the assessments in the module, the due date, the student’s status for the assessment (e.g. draft saved, completed, no submission, etc.), the marks they’ve received, and a column which indicates if their instructor has left feedback on any Blackboard assessments (there will not be an icon indicator if the student has feedback in a non-Blackboard submission).

At the top right of the screen, you can click on Student Activity to view a graph about the student’s activity over time alongside a graph of the student’s overall mark over time. Next to that, you can click on Accommodations to view and edit a student’s accommodation. Finally, you can click on the Send Message button at the end of the row to send a message to the student.
Grid View
Grid view shows a table with each student as a row and each assessment as a column, with marks in the corresponding cells.

You can use the search bar at the top left to search for an individual student or individual assessment, if you want to see just one row or column.
You can use the Filter button a the the top right-hand side of the screen for more custom filtering including by group(s), student(s), assessment(s) and category. For instance, if you want to view a group and three or four assignments, you can use the filter to see these specific view.
Next to that is a button that allows you to search for a specific Blackboard submission if you have the submission confirmation number.
After that are buttons to upload or download spreadsheets of the Gradebook (you can learn more about this in our guides on extracting grades and uploading grades).
Finally, there is a cog wheel icon for Settings for the Gradebook. When you click on this, you will see a side panel where you can see the marking schema, edit student performance criteria and determine if you want students to be notified based on this criteria, turn on or off automatic zeros for overdue work.

From this side panel, you can also set up the overall mark, add or edit assessment categories, and add rubrics.
For more information on the overall mark, you can review Blackboard’s guide on the overall grade and our 101 on the overall mark.