What is it?
Breakout groups are essentially miniature sessions within the main collaborate session. You can alternate between rooms and allow students to share and create content collaborative in the breakout rooms.
What does it do?
Alternating between rooms allows the instructor to check-in on students as if they were going round groups in a classroom setting. It is easy to switch between rooms and return your class to the main session once you are ready.
What should I know?
Alternate Between Rooms
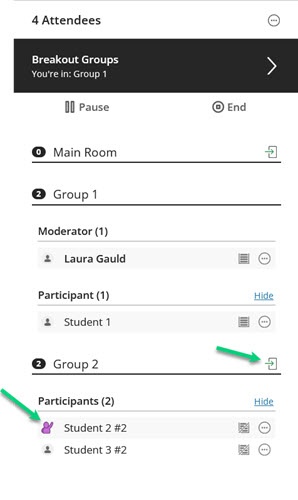
Moderators can go between rooms by clicking on the green door icon beside the group they want to enter.
In the breakout group tab, you can see any students who have their hands raised, so you can see at a glance if you are needed in a specific room.
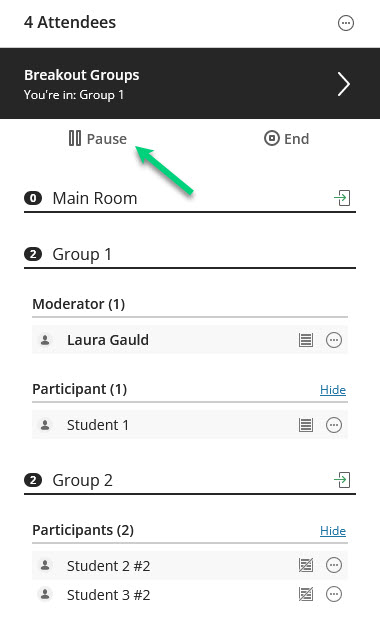
Pausing rooms
You can pause and resume groups if you want students to do small group work, return them to the main room to work again as a class, and then have them return to their same groups without having to set them up again.
Pausing and resuming will remove anything from the group chat, but the whiteboard will still be kept if the students had it open and were using it before the pause.
Ending breakout groups
To end the breakout groups, click on the stop icon in the top right-hand side of the breakout group panel that says “End”. This will return everyone to the main course room.
Accessing files uploaded by groups
You may want to suggest that one student shares their screen and they work on a document collaboratively, rather than using the whiteboard function. This is because rooms and any content other than uploaded files disappear once they end. Any work in the chat or whiteboard space will be lost.
You can send students to this guide on presenting in a live session to show them what they can do in a breakout room.
Once breakout rooms have ended, any files uploaded by the group can be accessed by the moderators before they leave the Collaborate session. Remember, these files types are limited to PowerPoints, PDFs, or images.
Step 1: Click on tab for Share Content and click on the option for Share Files. Here, you’ll see a file folder icon for each group that uploaded a file.
Step 2: Click on the folder to see a list of the uploaded file(s).
Step 3: In the three dot menu next to the item, you’ll see the options to rename the file, remove the file, or move the file to the main room.
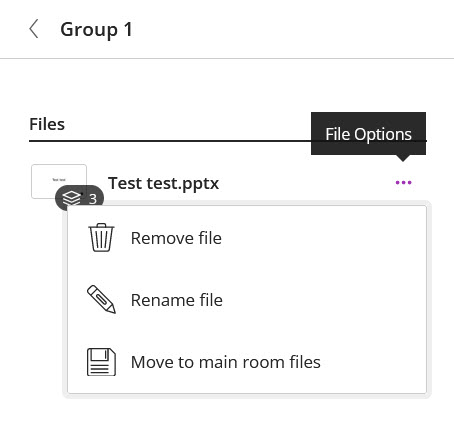
If you move the file to the main room, you can share it with the class the same way you would share a file you had uploaded.