What is it?
Enterprise Surveys are a Blackboard tool that can be used to deploy anonymous surveys to students in a modules/in modules.
What does it do?
It can be used to provide end-of-module surveys across individual modules across a school, discipline, year, etc.
What should I know?
Deployments distribute surveys to selected recipients at specific times. You can redistribute surveys by creating new deployments instead of creating new surveys. Each deployment can target different sets of recipients, display customised messages to recipients, and send automatic reminders to recipients who have not responded. After a deployment has ended, it cannot be restarted.
In order for you to access this tool, CTIL will give you the correct permissions to the relevant areas.
Step 1: In the left menu, select Tools and then Enterprise Surveys

You should be added to the default survey – renamed for each school (e.g. SoB Module Feedback). If you do not see this, please contact CTIL via Help4U to gain access to the required survey.

Step 2: Choose the option Response Periods. This is how you deploy each new batch of surveys.
Step 3: Click the button for Create Response Period at the top left of the screen.
Note: Below this you will see the full list of surveys that have been deployed previously. We recommend following existing naming conventions (e.g. English – Semester 1 2020-21, History – Semester 1 2020-21, etc.).
Step 4: In the first tab, Detailed Summary, description (optional). By default, anonymous responses are enabled. In most cases, surveys should remain anonymous. Click Save and Continue to move to the next tab.

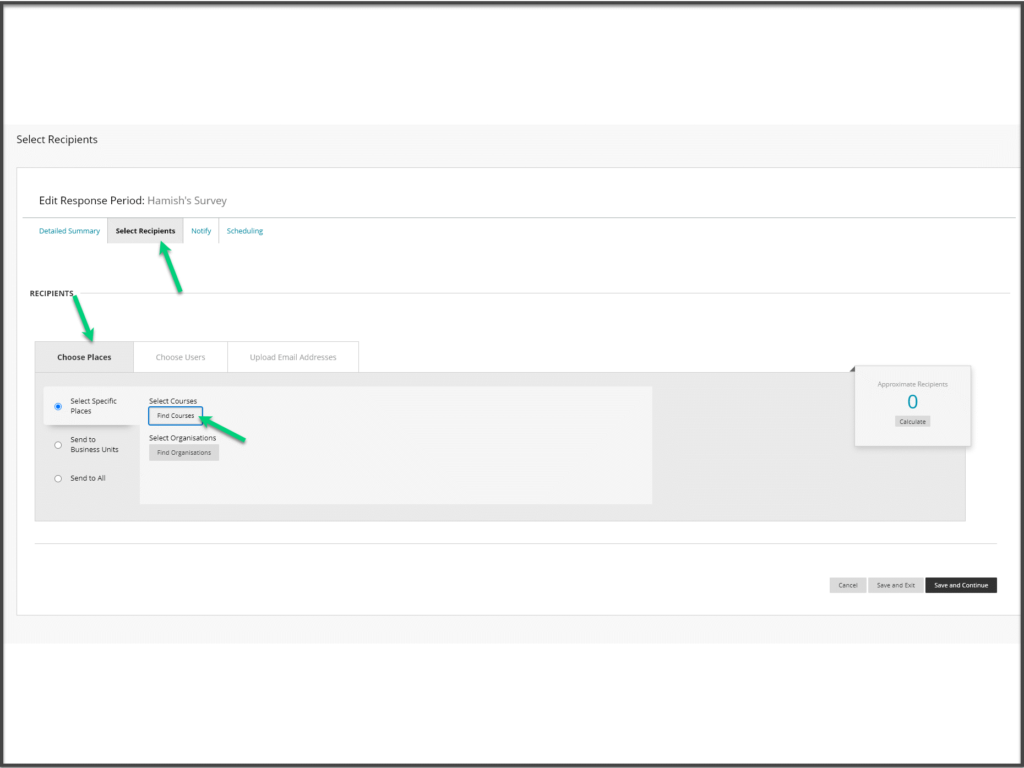
Step 5: In the second tab, Select Recipients, you can add recipients to the survey based on the module. Make sure the radial button is set to Select Specific Places and click the button Find Courses.
Update: Please do not use ‘Business Units’ to deploy surveys if you have any parent/child modules. There are currently issues with this method that would prevent any students on the child module receiving the survey (7/3/22)
Step 6: In the window that appears, use the search options to find the module(s) you’d like to add. We suggest changing the first drop-down to Course ID, the second to Starts with and then use the text box to enter the course prefix you are looking to add. You can even use the date range to try and remove older modules from appearing. Click Go to initiate the search (this button is easily missed).

Step 7: Use the tick boxes to select any and all courses you want to add using that search (pay careful attention to the course ID and course name to ensure you are selecting the correct module for the semester and year). Click Submit when you’re done.
Step 8: Repeat steps 5-7 for all modules you want included in the response period. When you
Step 9: When you are done, you will need to click on the button for Calculate and then Save and Continue.
Note: The Calculate button will tally the total number of surveys that will be sent out – this means if one student is on three modules receiving a survey, they will count as three, not one, in the calculation.
Step 10: In the Notify tab, you will need to click the option for Email. This is mandatory to deploy the survey in Ultra modules.
Step 11: Use the Edit tab to make an adjustments to the automatic email sent to students. If you edit the message, you will see a few fields with brackets around them (e.g. The survey [__INSTRUMENT.NAME__] has been made available to [__RESPONSE.COURSENAME__]), do not change the bracketed information. This will automatically update to the correct item when sent to the students – allowing a single email to be sent to students on multiple modules. You can use this same Edit tab in the Automated System Responses below, too.

Step 12: Review the email address in the From field. This will automatically be filled with the email of whoever is creating the response period, but this can be changed to a generic school email (if applicable). When you are happy with the notifications, click the button for Save and Continue.
Step 13: Use the Send Survey area to enter the date and time the survey will be released, the Close Survey area to enter the time when the survey will close. The Release Survey Results currently does not control anything in Ultra, so once you have set the dates, click Save and Exit.

Step 14: If you have set a date for the Send Survey, you will see a pop-up message when you click Save and Exit confirming the release date for the survey. If you are happy with this, click OK. Otherwise, go back and update any necessary information.