This guide will take you through the process for recording teaching activities in Enhanced Teaching Spaces. You can choose the video walkthrough, printable quick-guide, or detailed guide depending on which suits you best.
Walkthrough Video
(updated 12/09/2022)
A Quick Introduction to YuJa
YuJa is our video management service. It provides us with a complete video creation, management and distribution platform able to support range of media related activities. For the purposes of this guide, there are three key areas of functionality you should understand:
- YuJa has a software client that is installed on all lectern machines (and can be manually installed on any computer). This software allows you to record a range of sources from your computer including video inputs, screen capture and audio, which can then be easily uploaded to the YuJa platform itself for editing, management and distribution.
- YuJa stores your video content under your UoD account, allowing you to edit, share, distribute and manage these assets. Videos can be shared with specific groups or embedded in a different platform and shared universally.
- YuJa is connected to My Dundee so that you can share videos to your module-specific channels. Videos published to a module channel will then become accessible to students enrolled on your My Dundee module.
You can find specific help in our YuJa knowledge-base area and general guides on YuJa’s help site.
Detailed Guide
We’ve broken the process down into five parts: Pre-Session, In-Room Setup, Recording, Ending your Session, and Post-Session. Follow the below steps and click on each section to expand for more detail as required.
1.0 Pre-Session
1.1 Communicate how lecture capture will work in your module

It's important to be clear about the role of lecture capture and what students can expect. Typically it is a backup of your sessions, intended for learning reinforcement and that the quality reflects that purpose (as opposed to a well produced, reusable asset). Students are typically still expected to attend class.
How lecture capture fits into your learning design may vary from module to module, so it is important that module leaders inform the students of how it fits into the course design. You can detail this is in your My Dundee module page as well as in person at the start of the semester.
It's also important to explain the availability of the recordings. By policy, lecture recordings are removed at the end of an academic year, but you may wish to set your own availability window for longer or shorter durations.
1.2 Check the Timetable
Obviously, you and your students need to be aware of when and where each session is scheduled to happen, and you can do this through the published timetable produced by Registry. You should also check which type of room you have been assigned to be sure it is appropriate for your needs (e.g if you are running a Hybrid session).
Remember that Standard Teaching Spaces have basic recording facilities that support lecture capture as well as the usual in-room AV equipment. Enhanced Teaching Rooms were created out of the Hybrid Project in 2021, and support much more quality and functionality, including hybrid modes of teaching. Both support Lecture Capture, but be sure you've read the instructions for the room you're going to use.

2.0 In-Room Setup
2.1 Start the control panel

In enhanced rooms, you're using the new touch-panels to control the AV. Tap 'Start your session' to wake the system up while you log into the lectern computer. If you've used these rooms for Hybrid Teaching then this will be familiar.
2.2 Login to Lectern PC

Once you are in the room at the appropriate time and your students have started filing into the room, it's time to get logged in. Wake up the computer and enter your university credentials in the usual way.
2.3 Clip on the microphone
Enhanced rooms are equipped with wireless audio reinforcement microphones that can clip on to your clothing (lapel mics). These sets allow you to walk freely around the room without worrying about the audio pick-up. For lecture capture, we recommend you always use these to get the best possible audio recording of your voice.
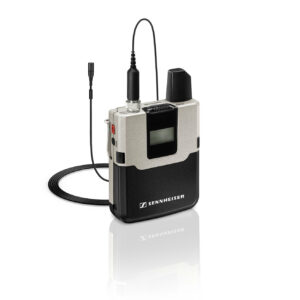
The mics are located on the lectern desk, seated in their charging station:
- Take out the battery pack and the little mic.
- The mic activates the moment you take it out of the dock and the light will turn green to indicate that it is active and unmuted.
- Clip the battery pack to your belt, waistband or similar area on your clothing.
- Clip the microphone to a suitable part of your clothing, usually around your upper torso or around your collar.
- If the light doesn't turn green, check the little switch on the battery pack to make sure it isn't manually muted.
Please remember to put these microphones back in their docking station when you are finished, and definitely do not forget about them and walk off to lunch still wearing them (yes, this happens).
2.4 Prepare your content
Before you start setting up the recording, you should get any presentation content ready on the computer. This is so that when you hit record, it's an easy transition to start your slides or whatever visual aids you are using.
Most of you will likely be using PowerPoint, in which case you should open you file, check the presentation settings are how you want them and stop short of starting the slideshow.
Note that in enhanced teaching spaces, you have two monitors. By default, the YuJa profile is set to record what happens on the primary monitor (the monitor that is mirrored to the projector/display). As such you should check to make sure you keep what you want recorded on that that display. It is possible to record both displays by changing the YuJa settings in step 2.8.

2.5 Launch YuJa
YuJa should already be running on all lectern computers. To initiate a recording session, click on the YuJa icon from the notification area of the Windows Taskbar (next to the clock/date). If the icon isn't immediately visible, you may need to click on the 'show hidden icons' tool (a little chevron next to the clock/date). This will open the 'YuJa Software Capture' window, ready to setup and start recording.

Alternatively launch YuJa from the start menu like any other applications by typing ‘yuja’ in the search tool.
If prompted - Login to the capture application, select ‘University of Dundee’ from the drop down and login using Single Sign-On (SSO) and click ‘Sign In’.
Note that you can also launch YuJa from within My Dundee by opening your module's video channel and clicking on 'Create Recording'.
2.6 Name your recording and select the channel
Once the YuJa software authenticates and opens, you are presented with a range of options for managing your recording:

- Enter a meaningful title in the white box. Note that if you leave this blank, it will automatically name the video generically with the time and date.
- Next, you can tell the software which channel the video will eventually be published to, i.e. your module in My Dundee.
2.7 Check the recording profile
Like when using Teams or Collaborate for an online meeting, YuJa allows you to select the screens, video devices, and microphones you want to record and share from. This allows you to configure your recording in various ways if you want to.
Each room has a pre-defined profile so you should be able to just leave everything as is, but it is recommended that you give these setting a quick scan to ensure they are correct.
Enhanced Teaching Spaces can be a little more complicated due to there being more options than Standard Spaces but again, stick with the default settings unless you have a specific use-case in mind.

You can confirm that the setting are correct using the preview in the middle of the YuJa window, which displays the selected video and screen sources, as well as an audio meter to confirm the microphone is picking you up.
For more information on configuring the YuJa software capture options, see our YuJa documentation.
2.8 'I'm ready to share'
With YuJa configured and ready to go, you now need to tap 'I'm ready to share' on the control panel:

As with a hybrid session, this will turn on the main camera and displays in the room. By default, the system will go the presentation mode. You can experiment with different modes and settings if required, but you need to be aware of how your settings in the YuJa recording will work with the changing settings of the room equipment.
For lecture capture, we recommend sticking to Presentation Mode as that keeps everything setup for recording standard presentation.
2.9 Notify your students
 Now that you are ready to start, you need to make sure the class is aware that you will be recording. This is not simply good practice, it also keeps you and others aware that there will be a microphone picking up what people say. This is especially true in Enhanced Teaching Spaces due to the extra microphone coverage. For example, students do grab opportunities to ask questions before and after classes, including personal queries that should never be recorded, so making everyone aware can reduce the possibility of this.
2.10 Start the recording and begin your session
Now that you're prepared and ready, click the 'Start' button to begin recording. The YuJa window will disappear, you will get a three second countdown and a discrete recording toolbar will appear on the bottom right of the screen.

3.0 Recording
3.1 Managing your recording
Once you've started recording, you can get on with your teaching as you usually would - start your slides, talk to your class etc.. While recording, YuJa will display a discrete toolbar in the bottom right of the screen, which allows you to control the recording throughout the session, including bringing the full control window back, pausing, stoping and monitoring the audio.

To PAUSE the recording use the pause button. You can press it again to restart the recording without ending the whole session, which is very useful for excluding segments that maybe aren't suitable for recording, like a discussion segment.
To STOP the session use the stop button. Doing this will end the recording completely, meaning that you would have to create a completely new recording if you want to carry on, resulting in multiple files.
The audio meter is useful to check that you are still being picked up.
Hotkeys
You can also control the recoding with hotkeys:
Start Recording: CTRL + SHIFT + S
Pause Recording: CTRL + SHIFT + P
Finish Recording: CTRL + SHIFT + F
3.2 Audio
When using the wireless microphones you don't need to worry about moving out of range or facing the wrong way as you would in standard teaching spaces, with the desk-mounted mics. You can move freely, talking in a clear voice and be confident that the microphone will pick you up.
If you want reassurance that the mic is working, you can check the small YuJa control described in the previous step, which has a small audio meter.
3.3 Screen recording
With the default recording settings, what is displayed on the primary monitor/projector screen is what YuJa will continue to record. You can change devices (e.g. document camera or wireless display) using the touch-screen control panel and that is what will be captured.
The exception is the DVD player - the DVD player will not be recorded by YuJa due to the copyright protection implemented on these systems. If you need students to able to re-watch such video content then you will need to find another, copyright-friendly way to do so
You can read more about changing devices in the Dual-Mode guide.

Another thing to keep in mind is the dual-monitor setup in enhanced spaces. By default you are only recording the primary monitor. This gives you one monitor for things you do want recorded and another for things you do now e.g. checking your emails. Again, it will take some experience to get used to how the recording setting in YuJa work with the various options available to you in the touch-screen control panel for the room hardware.
3.4 Video
You can change the video source using the touch-screen control panel and the YuJa recording will follow your changes. For example, if you switch over to discussion mode the the camera source being recorded will be the audience facing camera, just as it works for hybrid teaching. Similarly, if you mute the cameras, this will also mute the video in the YuJa recording.
Generally, for standard lecture capture, most users will simply leave the cameras on Presentation mode.
3.5 Ending your recording
Once you have completed your teaching session, you can stop the recording either by click on the stop button or using the CTRL+SHIFT+F hotkey combination.

This will end the recording and essentially close the file. Remember that when you press stop, you will need to start a completely new recording to continue, so remember to use Pause when you just want to take a break during the same session.
It would be a good idea to get into the habit of stopping the recording immediately when you finish your session, since students have a habit of leaping on the opportunity to come ask the lecturers questions, including personal ones. End the recording quickly so that you don't forget and end up recording anything that shouldn't be recorded.
4.0 Ending your Session
4.1 Publish now or save for later?
When you end the recording, you are presented with a windows saying 'Your capture session has ended'. This is where you must choose whether to immediately publish, delete or save your recording. Do not skip this step - you must choose one of the options or your recording may be lost.

Post Now will upload and immediately publish the recording to the module channel you specified at the start. This is the easiest way to publish, but be sure that you're happy for everything that was recorded to immediately go to your students.
Delete removes your recording. Obviously, you should be careful with this as there's no going back!
Save will upload the recording but it won't publish - you will need to publish manually later.
4.2 Uploading
Whether you choose to save or post your recording, it will then upload the recording to the server, where it will then appear in your My Media folder in YuJa. You will see a little status window in the bottom right of the screen:

You do not need to do anything at this point and even if you log off before the upload is complete, it will continue to upload in the background - so long as the computer is not switched off.
4.3 Log-Off and shut down the room
With the reassurance that your recording will continue to upload, feel free to log off and head for a well deserved cuppa. Do not switch computers off and please leave rooms in a good state with microphones and cameras left in place.
Don't forget to switch off the room hardware by tapping 'Exit' followed by 'Shut Down' on the touch-screen control panel.


5.0 Post-Session
5.1 What happened to your recording
The moment your video finishes uploading, YuJa begins processing the file. This includes replicating the video at different quality levels to support play at different internet speeds, auto captioning the video, and generally optimising the experience of your content.
You can find the video by returning to your My Dundee module, opening the video channel and clicking on My Media:

If you didn't name the file manually at the start of the process, YuJa will name it 'My Event on [date]'. From here, you can hover over the video thumbnail and choose to Play, Share, Publish, Delete, Edit, or click More to open up the full video properties.

For lecture capture, this is where you might want to go to clip bits of the recording out that shouldn't be there or rename the file to something more meaningful to your course design. You can read more about these options on the YuJa support pages.
5.2 Publishing if you didn't already
If you already selected a video channel in step 2.6 and chose to 'Post Now' in step 4.1, then your video should already be published.
However, if you wanted to delay publishing (or just want to check), hover over the video thumbnail and choose 'Publish' from the little menu. This will open a window where you can search for and select from all the video channels you are attached to.
 You can also use this tool to check where the video is already published and un-publish videos if needed. Note that you can publish to multiple channels if you want, e.g. for courses with multiple modules/cohorts attached.
5.3 Where your students can find the recordings
Recordings that are published will appear in the modules video channel in My Dundee. Students should login, navigate to the module and open the 'Video Channel (YuJa)' section.

However, depending on how your module is designed, you may want to add your module 'in-line' with your module content. For example, if using the week-by-week design recommended in the default module template, you can add the videos for each week into their respective folders. See our guide on embedding YuJa videos for how to do this.