What is it?
There are many settings for Blackboard tests that allow you to customise the release of questions, marks, and feedback.
What does it do?
This guide will walk you through the complete settings panel when using a Blackboard test, so you can have control over your test.
What should I know?
Click on the cog wheel next to Test Settings or click on any of the links in the side menu, and a panel will appear for the full settings for tests and assignments.
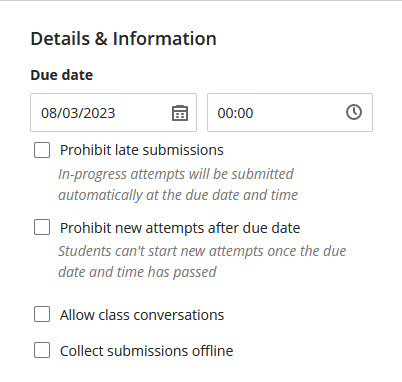
Details & Information
In the Details & Information section, you will need to add in the due date and time. You can also add in any settings you’d like to prohibit late submission or prevent students from starting the assignment after the due date has passed.
You can also allow a class conversation – this is a discussion board linked to this specific assignment.
Finally, you can use the option for offline submissions. This option lets you provide marks and feedback within your module page for assignments that are handed in as hard copy only. You should not use this option if you want students to submit anything digitally.
Presentation Options
This section will help you control options about how questions appear to students.
First, you can decide if you want questions to be displayed one at a time. This means that each question appears alone on its own page. If you enable this option, you will then have the ability to Prohibit backtracing so that students cannot return to earlier questions. Displaying questions one at a time is the only setting that will allow prohibiting of backtracking to be enabled at this time.
Next, you have the options to randomise questions. You can also randomise answers for multiple choice questions.
If you have set up pages, you will have the option to randomise pages. You can also keep your first page in place as it may include instructions for the test as a whole.
Note that if you add the option to randomise pages, the option to randomise questions adds text which specifies that “questions will be randomised within the page”.

Marking & Submissions
In the Marking & Submissions section, you can determine the category, the number of attempts, select the marking schema (for example, points or 23 to Alphanumeric). You cannot adjust total points, as this is controlled by the question points in the test itself.

We recommend that you allow two submissions so that students have a back-up already in place if they have any technical difficulties when they try to submit. However, you can also add an extra attempt to a specific student, so if you keep this as one attempt, you still have the ability to allow more submissions on a case-by-case basis.
If you have allowed more than one attempt, you will have a few option to determine which attempt will be marked. These include:
- Average of all attempts
- First attempt with a mark
- Attempt with the highest mark
- Last attempt with a mark
- Attempt with lowest mark
For a test, you cannot use anonymous settings, assign multiple markers, or use peer review.
We recommend that you tun off the “Post assessment marks automatically”. For tests that only contain automatically marked questions (any question type barring essay questions), this setting would post marks to each student immediately after they submit. You will have more control over the release of marks in the next section, Assessment Results, so we recommend you use those instead.
Assessment Results
This section allows you to have control over what results are released to students and when. If you click any of the links in this section, it will take you to the same panel, so you will only need to click on one of these to adjust all of this information.

In the side panel, you will have the option to toggle on or off if students can view their submission, see automated feedback, see individual question scores, or see correct answers.
If you allow students to view their submission, you will see a drop-down menu to decide if students can see their submission:
- After submission
- After individual mark has been posted
- After due date
- After all marks have been posted
- On a specific date
This setting is first and separate as any other feedback conditions will apply after the submission is visible.
Next, you can decide when to release any automated feedback you may have added (this is added in each question when you set up the test, see our guide for how to do this), these options are:
- After submission
- After due date
- After all marks have been posted
- On a specific date
You can decide to show question scores:
- After individual mark has been posted
- After due date
- After all marks have been posted
- On a specific date
Finally, if you enable “Show correct answers”, the “Show question scores” will be on toggled on automatically. You can also decide when to release correct answers with the possible options:
- After individual mark has been posted
- After due date
- After all marks have been posted
- On a specific date
Assessment Security
The option in the assessment security is to add an access code. This will automatically generate a six-digit code that students will have to enter before they can access the test. This is useful if you have not set up any restrictions on submitting or starting late work and you want to provide a single student with an additional attempt. For this specific use case, you can change the attempts from “1” to “2”, turn on the access code, and only provide the code to the student who you would like to have the additional attempt.
As this code will lock the test, this is best used after the assignment due date has passed so you don’t restrict students who are trying to submit normally. That is also why you will need to make sure that restrictions for late work are not applied. We realise this can be a bit confusing, so if you have any questions, please don’t hesitate to give us a shout through Help4U.
Additional Tools
In the additional tools section, you can add a time limit. This will start from the moment students click “start attempt”. If you turn this one, you can also decide if you want work to be automatically saved and submitted at the end of this timer or if you want to add additional time. The additional time added is currently very constrained – you have the options of allowing 50%, 100%, or unlimited extra time.
If you set this up accidentally, you can hover over the time limit link and a bin icon will appear. Clicking on that icon will remove the time limit.
You can ignore the next three items as you cannot use rubrics or groups with test and goals are set up as a university, and as we don’t have these set up.
Finally, the last option is to set up a SafeAssign report. This is much like Turnitin’s similarity report, although it has less robust features than Turnitin – such as a not-very-effective integration with anonymous marking that we mentioned earlier.
To use SafeAssign, you will want to click the link for “Enable SafeAssign” and then tick this box to “on” in the next screen. Once you’ve enabled this you will have two further options – to allow students to view their reports and to exclude submission’s from Blackboard’s database.
We strongly recommend that you turn on the ability for students to view their reports as it can help students learn how to cite their work correctly. It is also standard that students will see their reports in Turnitin, so they will likely expect to have access to this as well. We recommend that you turn off the option is to exclude submissions from Blackboard’s database.

Once you’ve set up your assignment, be sure to click Save at the bottom of the settings panel.
Finally, we strongly recommend that once you have completed setting up your assignment that you use your Student Preview account to view the assignment and test any settings to make sure that the assignment is set up and functioning as you would expect. As you saw, there are many settings and adjustments to one setting can impact another setting.